

https://jinudmjournal.tistory.com/115
[Android, Kotlin] 댓글, 답글 기능 구성하기 +Swipe 메뉴로 댓글 삭제, 추가 기능 구현 [1]
Comment + Child Comment 댓글 기능과 답글 기능을 구현할 때 depth를 우선적으로 생각해야 한다. 댓글의 답글의 답글을 어디까지 달 수 있는지 설정해야 하며, depth가 2인 경우를 일반적으로 한다. 댓글
jinudmjournal.tistory.com
위 포스팅에 이은 두번째 글입니다.
addData, addChildData - 데이터 추가
댓글과 답글 리스트를 보여주는 기능 후에 데이터를 추가하는 기능을 작성했다.
부모가 없는 댓글을 다는 경우에는 단순히 리스트의 가장 마지막에 데이터를 추가하면 된다.
    fun addData(comment: Comment): Int {
        itemSet.add(comment)
        notifyItemInserted(itemCount - 1)
        notifyItemRangeChanged(0, itemCount)
        return itemCount
    }
이 후에 데이터가 추가되었음을 알리고 데이터의 범위를 갱신한 후 데이터 수를 리턴한다.
반면에 부모가 있는 댓글을 다는 경우, 해당 부모의 자식들의 가장 마지막에 데이터를 추가해야 한다.
이 경우 addChildComment라는 함수를 통해서 다른 알고리즘으로 데이터를 추가해주어야 했다.
답글을 다는 경우 댓글 리스트의 맨 아래가 아닌, 같은 부모를 가지는 답글들의 가장 마지막에 데이터를 추가해야 하기 때문이다.
    @SuppressLint("NotifyDataSetChanged")
    fun addChildData(comment: Comment): Int {
        itemSet = addChildComment(itemSet,comment)
        notifyDataSetChanged()
        notifyItemRangeChanged(0, itemCount)
        return itemCount
    }
데이터를 새로 추가하고 정렬하는 addChildComment함수를 통해서 재정렬하는 과정이다.
[ addChildComment ]
fun addChildComment(dataSet: ArrayList<Comment>, newData:Comment) : ArrayList<Comment>addChildComment의 경우 2가지 경우를 나눠서 탐색해야 한다.
첫 번째는 새로 들어갈 데이터가 부모 뷰의 첫번째 자식일 경우이다.
이 케이스는 부모 뷰의 다음에 데이터를 추가하면 된다.
두 번째는 새로 들어갈 데이터가 부모 뷰의 여러 자식들 중의 마지막 자식일 경우이다.
이 케이스는 자식 뷰들의 가장 뒤의 인덱스를 안 후, 데이터를 추가하면 된다.
두 가지의 경우를 탐색하기 위해서 부모 뷰가 존재하는지, 같은 부모를 가지는 데이터 리스트의 마지막 데이터가 존재하는지 탐색한다.
같은 부모를 가지는 데이터 리스트의 마지막 데이터가 존재한다면, 2번째 케이스의 경우이고, 존재하지 않다면 첫 번째 케이스이다.
    if (parent != null && lastChild != null){
        if (lastChild == null) {
            // 존재하는 자식 뷰가 없음 -> 부모뷰 뒤에 add
            dataSet.indexOf(newData).let {
                if (it != -1) {
                    dataSet.add(it + 1, newData)
                }
            }
        } else {
            // 존재하는 자식 뷰 중에 가장 뒤의 값 찾음 -> 마지막 자식 뒤에 add
            dataSet.indexOf(lastChild).let {
                if (it != -1) {
                    dataSet.add(it + 1, newData)
                }
            }
        }
    }
    return dataSet
2 가지 경우로 나누어서 해당 위치에 새로운 데이터를 추가한 후 데이터를 반환한다.
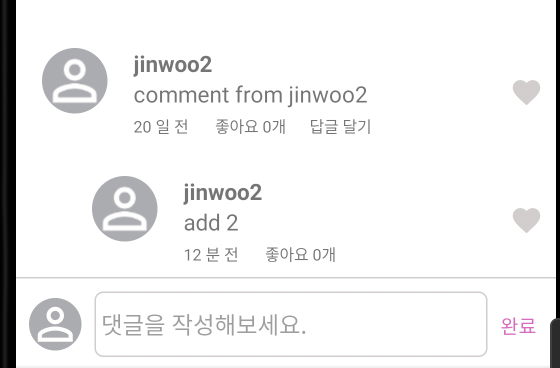
데이터를 추가할 경우 위와 같이 부모뷰를 찾아서 답글이 등록된다.
if (parentComment!=-1){ //자식 추가
posting.commentCount = commentAdapter.addChildData(newData!!)
}else { //부모 추가
posting.commentCount = commentAdapter.addData(newData!!)
}
댓글, 답글을 추가하는 2가지 케이스로 나누어서 데이터 추가 함수를 적용시켰다.
delData - 데이터 삭제
delData의 경우 우선 swipe 메뉴를 통해서 delete 버튼을 스와이프 동작으로 나타나게 해야한다.
https://jinudmjournal.tistory.com/114
[Android, Kotlin] RecyclerView에서 Swipe Menu 구현하기, Delete 메뉴 + Card View [3]
https://jinudmjournal.tistory.com/112 [Android, Kotlin] RecyclerView에서 Swipe Menu 구현하기, Delete 메뉴 + Card View [1] Swipe Menu with RecyclerView - 데이터 구성 리싸이클러 뷰 내부에서 item을 슬라이드할 때 DELETE 버튼이
jinudmjournal.tistory.com
이전에 작성한 포스팅인데, 해당 기능을 적용한다면 아래와 같은 뷰를 얻을 수 있다.

delete 버튼을 클릭하였을 경우 데이터 삭제를 진행한다.
상세한 코드는 하단에 작성하였으며, 어댑터의 delData 함수를 통해서 데이터 삭제를 진행한다.
    fun delData(position: Int, userId: String?) : Int? {
        // 내가 쓴 댓글만 삭제 가능
        if (itemSet[position].userInfo?.id == userId && userId != null) {
            val delId = itemSet[position].commentId
            itemSet.removeAt(position)
            notifyItemRemoved(position)
            notifyItemRangeChanged(position, itemCount)
            return delId
        }
        return null
    }
주의할 점은 다른 사람이 작성한 댓글을 삭제할 수 없도록 id값을 조사하는 코드를 작성해야 한다.
빠진점이 있는데, 해당 댓글을 삭제할 경우 자식 댓글들도 삭제하는 기능도 추가해야 한다.
그 외 기능
어댑터에 대한 동작은 OnItemClickListener 인터페이스를 통해서 작동한다.
    private var onItemClickListener: OnItemClickListener? = null

    interface OnItemClickListener {
        fun userClick(userInfo: UserInfo)
        fun likeClick(commentId: Int, like: Boolean)

        //답글
        fun addSubComment(comment: Comment)
    }

    fun setOnItemClickListener(listener: OnItemClickListener) {
        this.onItemClickListener = listener
    }
액티비티나 프래그먼트에서 해당 기능을 사용하도록 인터페이스로 구현하였다.
userClick과 likeClick은 유저 프로필, 좋아요 기능이므로 생략하고, addSubComment 기능을 사용하면 된다.
답글 달기 기능을 적용하는 reComment를 클릭 시 addSubComment 함수를 호출한다.
            binding.reComment.setOnClickListener {
                onItemClickListener?.addSubComment(data)
            }
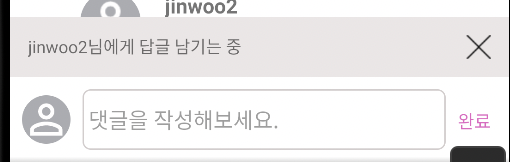
프래그먼트에서 오버라이드해서 사용하였으며, childTextBox를 보여주며 누구에게 답글을 다는지 나타낸다.
                    @SuppressLint("SetTextI18n")
                    override fun addSubComment(comment: Comment) {
                        //답글 달기
                        binding.childTextBox.visibility = View.VISIBLE
                        parentComment = comment.commentId
                        comment.userInfo?.let {
                            binding.childText.text = "${it.id}님에게 답글 남기는 중"
                        }
                    }
답글 달기를 클릭할 경우 아래의 뷰를 얻을 수 있다.
Swipe 기능을 현재 프로젝트에 맞춰서 수정했다.
상세한 코드는 아래와 같다.
불필요한 부분을 삭제하고, 버튼 뷰의 크기를 더 작게 만들었다.
ButtonsState
enum class ButtonsState {
    GONE,
    RIGHT_VISIBLE
}
SwipeControllerActions
interface SwipeControllerActions {

//    fun onLeftClicked(position:Int)
    fun onRightClicked(position: Int)

}
SwipeController
class SwipeController : ItemTouchHelper.Callback() {

    private var swipeBack : Boolean = false
    // 현재 버튼 상태
    private var buttonShowedState : ButtonsState = ButtonsState.GONE
    private val buttonWidth : Float = 200F
    private var buttonInstance : RectF? = null //동적 버튼
    // 액션 이벤트
    private var buttonActions : SwipeControllerActions? = null
    fun setButtonActionListener(listener:SwipeControllerActions){
        this.buttonActions = listener
    }
    // 현재 선택 뷰 홀더 정보
    private var currentItemViewHolder : ViewHolder? = null


    override fun getMovementFlags(
        recyclerView: RecyclerView,
        viewHolder: RecyclerView.ViewHolder
    ): Int {
        val swipeFlags = ItemTouchHelper.LEFT or ItemTouchHelper.RIGHT
        return makeMovementFlags(0,swipeFlags) //좌우 스와이프만 허용
    }

    override fun onMove(
        recyclerView: RecyclerView,
        viewHolder: RecyclerView.ViewHolder,
        target: RecyclerView.ViewHolder
    ): Boolean {
        return false
    }

    override fun onSwiped(viewHolder: RecyclerView.ViewHolder, direction: Int) {}

    override fun convertToAbsoluteDirection(flags: Int, layoutDirection: Int): Int {
        // 스와이프 시 버튼을 나타내는 동작 설정
        if (swipeBack){
            swipeBack = buttonShowedState != ButtonsState.GONE
            return  0
        }
        return super.convertToAbsoluteDirection(flags, layoutDirection)
    }

    override fun onChildDraw(
        c: Canvas,
        recyclerView: RecyclerView,
        viewHolder: ViewHolder,
        dX: Float,
        dY: Float,
        actionState: Int,
        isCurrentlyActive: Boolean
    ) {
        // 스와이프 상태일 때 적용
        if (actionState==ACTION_STATE_SWIPE){
            if (buttonShowedState != ButtonsState.GONE){
                // 버튼이 보여지는 상태
                var dx = dX
                // 스와이프 중인 뷰를 고정 시킴
                if (buttonShowedState==ButtonsState.RIGHT_VISIBLE)
                    dx = Math.min(dX,-buttonWidth)
                super.onChildDraw(c, recyclerView, viewHolder,
                    dx, dY, actionState, isCurrentlyActive)
            }else{
                setTouchListener(c,recyclerView, viewHolder,
                    dX, dY, actionState, isCurrentlyActive)
            }
        }
        if (buttonShowedState == ButtonsState.GONE) {// 버튼 off
            super.onChildDraw(c, recyclerView, viewHolder,
                dX, dY, actionState, isCurrentlyActive)
        }
        currentItemViewHolder = viewHolder // 현재 관리 중인 뷰 홀더 설정
    }

    private fun setTouchListener(
        c: Canvas,
        recyclerView: RecyclerView,
        viewHolder: ViewHolder,
        dX: Float,
        dY: Float,
        actionState: Int,
        isCurrentlyActive: Boolean
    ){
        recyclerView.setOnTouchListener(object :OnTouchListener{
            override fun onTouch(p0: View?, p1: MotionEvent?): Boolean {
                p1?.let{event ->
                    swipeBack = event.action == MotionEvent.ACTION_CANCEL
                            || event.action == MotionEvent.ACTION_UP

                    // 얼마나 많이 드래그 했는지 확인
                    // 좌,우 스와이프 상태 확인
                    if (swipeBack){
                        if (dX < -buttonWidth)
                            buttonShowedState = ButtonsState.RIGHT_VISIBLE

                        if (buttonShowedState!=ButtonsState.GONE){
                            setTouchDownListener(c,recyclerView, viewHolder,
                                dX, dY, actionState, isCurrentlyActive)
                            setItemClickable(recyclerView,false)
                        }
                    }
                }
                return false
            }

        })
    }

    private fun setTouchDownListener(
        c: Canvas, recyclerView: RecyclerView,
        viewHolder: ViewHolder,dX: Float,dY: Float,
        actionState: Int,isCurrentlyActive: Boolean
    ){
        recyclerView.setOnTouchListener(object : OnTouchListener{
            override fun onTouch(p0: View?, p1: MotionEvent?): Boolean {
                p1?.let{event ->
                    if (event.action == MotionEvent.ACTION_DOWN){
                        if (event.action==MotionEvent.ACTION_DOWN){
                            setTouchUpListener(c,recyclerView, viewHolder,
                                dX, dY, actionState, isCurrentlyActive)
                        }
                    }
                }
                return false
            }

        })
    }

    private fun setTouchUpListener(
        c: Canvas, recyclerView: RecyclerView,
        viewHolder: ViewHolder,dX: Float,dY: Float,
        actionState: Int,isCurrentlyActive: Boolean
    ){
        recyclerView.setOnTouchListener(object : OnTouchListener{
            override fun onTouch(p0: View?, p1: MotionEvent?): Boolean {
                p1?.let{event ->
                    if (event.action == MotionEvent.ACTION_UP){
                        this@SwipeController.onChildDraw(c,recyclerView, viewHolder, 0F, dY, actionState, isCurrentlyActive)
                        // 터치 리스너 재정의
                        recyclerView.setOnTouchListener(object : OnTouchListener{
                            override fun onTouch(p0: View?, p1: MotionEvent?): Boolean {
                                return false
                            }
                        })
                        setItemClickable(recyclerView,true)
                        swipeBack = false

                        if (buttonActions != null && buttonInstance != null
                            && buttonInstance!!.contains(event.x,event.y)){
                            // 선택 된 값이 null이 아닐 때 실행
                            // right -> right 클릭 이벤트
                            // lift -> left 클릭 이벤트
                            if (buttonShowedState == ButtonsState.RIGHT_VISIBLE) {
                                buttonActions?.onRightClicked(viewHolder.absoluteAdapterPosition)
                            }
                        }
                        buttonShowedState = ButtonsState.GONE
                        currentItemViewHolder = null
                    }
                }
                return false
            }

        })
    }
    private fun setItemClickable(recyclerView: RecyclerView,boolean: Boolean){
        for (i in 0 until recyclerView.childCount){
            recyclerView.getChildAt(i).isClickable = boolean
        }
    }

    private fun drawButtons(c : Canvas, viewHolder: ViewHolder){
        // 버튼 정보 등록
        val buttonWidthWithoutPadding = buttonWidth - 20
        val corners = 16F
        val itemView = viewHolder.itemView
        val p = Paint()

        // 삭제 버튼 생성
        val rightButton = RectF(itemView.right-buttonWidthWithoutPadding,
        itemView.top.toFloat(),itemView.right.toFloat(),itemView.bottom.toFloat())
        p.color = Color.RED
        c.drawRoundRect(rightButton,corners,corners,p)
        drawText(c,rightButton,p)

        buttonInstance = null
        if (buttonShowedState == ButtonsState.RIGHT_VISIBLE){
            buttonInstance = rightButton
        }
    }
    private fun drawText(c:Canvas,button:RectF,paint: Paint){
        val textSize = 30F
        paint.color = Color.WHITE
        paint.isAntiAlias = true
        paint.textSize = textSize
        val textWidth: Float = paint.measureText("DELETE")
        // 중앙 위치에 텍스트 그리기
        c.drawText("DELETE",button.centerX()-(textWidth/2),button.centerY()+(textSize/2),paint)
    }


    fun onDraw(c:Canvas){
        currentItemViewHolder?.let { drawButtons(c,it) }
    }

}
Fragment에서 swipe 적용
    // del comment swipe
    private fun setSwipe(){
        val swipeController = SwipeController()
        swipeController.apply {
            setButtonActionListener(object : SwipeControllerActions{
                override fun onRightClicked(position: Int) {
                    val isDelete = commentAdapter.delData(position,
                    mainActivity.myAccountViewModel.userProfile?.name)
                    if (isDelete!=null){ //삭제 성공
                        communityComment.delComment(isDelete,reviewId, paramFunc = { _,_-> })
                    }
                }
            })
        }
        // 스와이프 터치 리스너를 등록
        val itemTouchHelper = ItemTouchHelper(swipeController)
        itemTouchHelper.attachToRecyclerView(binding.commentListView.commentList)
        // 버튼을 그려주는 동작
        binding.commentListView.commentList.addItemDecoration(object : RecyclerView.ItemDecoration(){
            override fun onDraw(c: Canvas, parent: RecyclerView, state: RecyclerView.State) {
                swipeController.onDraw(c)
            }
        })
    }
반드시 뷰를 그려준 후에 선언해야, 리싸이클러뷰에 적용된다.
                    initComment(posting.reviewId)
                    setSwipe() // del button swipe
initComment : 댓글 리스트를 서버에서 불러오고 리싸이클러뷰에 적용하는 함수